No products in the BAG.
Maintenance
- ALL MODELS – MAINTENANCE SCHEDULE
In order to keep all PowerFloat models in good working condition, owners are advised to perform regular maintenance operations at specified intervals of operation. By performing regular maintenance operations, PowerFloat models can be kept clean, free of obstructing debris, and reduce the likelihood of repair work becoming necessary.
The following chart illustrates which maintenance to perform and at what intervals in the PowerFloat’s operating life-cycle.
Maintenance Required
Wipe down PowerFloat Motor
Cleaning the Grinding Head
Blow out all air passages with compressed air
Lubricate the Grinding Head
Brush inspection and lubrication
Oiling the Collar Joint (Plug-In only)
Replace the in-line clutch (Cordless only)
Interval
After each dental procedure
After each dental procedure
Monthly, store bought canned air can be used
After 6 dental procedures or before putting the instrument away even if only one dental procedure was done. Always leave grease in the grinding gear head before storing the PowerFloat each day. When storing the PowerFloat, we recommend storing it in a warm facility and keep lid open to air dry equipment.
Twice a month
Annually with heavy use
If you are experiencing issues with your PowerFloat contact us at 1-877-969-2233 to discuss repair or maintenance options.
- GRINDING HEAD LUBRICATION PROCEDURE
**Only Non-Toxic USDA Approved Synthetic Grease Should Be Used**
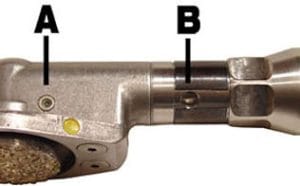
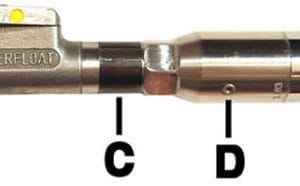
The PowerFloat® has two grease fill ports. One located on the end of the grinding head (Fig.1 A); and the other located further along the shaft, situated beside the collar (Fig.2 D). USDA approved synthetic grease is required for smooth operation.
Grease should be applied at the end of the day prior to putting equipment away.
- To grease, rotate the shaft locking cover (Fig.2 C), until the shaft hole is uncovered (Fig.1 B).
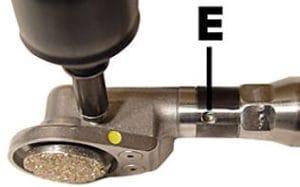
- The grease gun performs similar to a plunger. Insert the tip into the grease port and push down on the grease gun (don’t use excessive force) to force grease into the grease port (Fig.3).
- Apply grease until a small amount of new grease (i.e. clean) is seen coming out of the shaft locking hole (Fig.3 E).
- Two to four full pumps of grease into Grease Port (A) should be sufficient. The rule is to pump grease into Grease Port (A) until clean grease circulates through and exits from the shaft opening. The Grease Port usually requires two pumps from the grease plunger. Synthetic grease (USDA approved) can usually be purchased at local automotive retail stores.

Fig1 Fig2 
Fig 3 CAUTION:
Do not apply grease into grease port unless the port opening is clean enough to see the silver check valve ball. Before applying the grease to the grease port, clean any debris from the opening. Do not insert a hypodermic needle or sharp object into the opening to clean debris. Only clean opening with with a wet, stiff bristled, nylon brush. Beneath the opening lies a small spring-loaded ball. Excessive pressure with any instrument may damage the mechanism. After physical removal of tooth debris from the port area, more cleaning may be done by spraying the area with WD-40™. Always lubricate grinding head before storing. Greasing before storage will aid in the prevention of corrosion of the internal gears and bearings.Inability to grease means that the grease fitting ball (grease port) has seized. Contact PowerFloat to obtain a new fitting (grease port) with instructions for replacement.
**Only Non-Toxic USDA Approved Synthetic Grease Should Be Used**
- KEEPING THE MOTOR CLEAN AND DRY
Clean and towel dry hands when doing dental procedures to keep motor housing clean. Periodically blow out all air.
- KEEPING THE GRINDING HEAD CLEAN
Dry brushing of the grinding wheel can be accomplished by placing a soft steel or nylon brush on the wheel and spinning the wheel at 500 to 1000 rpms. After cleaning the grinding head and right angle, remove excess tooth material from the area with a dry towel. Do not immerse the grinding wheel and right angle into water. The grinding wheel can be cleaned with a wet brush by wetting and cleaning the brush in chlorhexidene and water. If using the electric plug in model adhere to electrical safety standards and clean the grinding wheel and right angle end with the Powerfloat unplugged from the electrical outlet.After cleaning always lubricate the right angle gear system before storing the PowerFloat. It is important to prevent corrosion of the gear system by keeping the gears well lubricated with a food grade anticorrosive lubricant.
CAUTION: Wear safety glasses while performing this operation.
(DO NOT IMMERSE THE RIGHT ANGLE GRINDING HEAD IN WATER)
- BRUSH INSPECTION AND LUBRICATION
For your continued safety and electrical protection, brush inspection and replacement on PowerFloat should ONLY be performed by PowerFloat Inc. or authorized repair facility. If you are experiencing issues with your PowerFloat contact PowerFloat Inc. toll free 1877-969- 2233 to discuss repair or maintenance options.
Any loss of power before the above maintenance check may indicate the need for immediate servicing of your PowerFloat.
DO NOT CONTINUE TO OPERATE POWERFLOAT® UNDER THIS CONDITION.Contact the PowerFloat Office in order to arrange immediate service.
- OILING THE COLLAR JOINT – PLUG-IN AND CORDLESS MODELS ONLY
Twice monthly, place a few drops of 3-In-1 oil into the gap (A) (Fig.1) between the stainless steel collar and black collar to prevent dental material from adhering to rotational mechanism. The collar gap may also be cleaned with WD-40™. Keep debris from entering the collar gap by using a towel on hands and by periodic cleaning of the area with towel.

- IN-LINE CLUTCH REPLACEMENT
If the grinding wheel begins to stall when little pressure is applied to the grinding disc during a dental procedure then the in-line Clutch will require replacement. This is a non-maintainable part and will require service by PowerFloat Inc. or your regional distributor.
- OPERATING THE ELECTRIC PLUG-IN IN WET ENVIRONMENTS
The electric plugin model of the PowerFloat should not be used in a wet environment. The electric plugin model should always be plugged into a ground fault circuit interrupter which in turn is plugged into an electric outlet to protect the patient and operator from electric shock. Do not plug the PowerFloat directly into an electric outlet unless that outlet has ground fault circuit interrupter protection. Keep the working area clean, free from obstacles, and dry. Do not allow small children to come into the working area. The PowerFloat should not be used if the footing is wet or muddy. The veterinarian should wear examination gloves. The PowerFloat should be kept clean and dry. In order to keep the float dry the veterinarian should always have a dry towel on hand to wipe any moisture from the electric drill housing and trigger switch. Periodically the horse’s mouth will have to be flushed with water. After flushing out the mouth, allow all the water to run out of the mouth before beginning the floating procedure. Use a towel to keep hands dry after the initial examination of the mouth. Always suspend the electrical cord from an elevated position to keep it from laying on the ground. Periodically blow out all PowerFloat drill air vents with compressed air to keep the motor from accumulating dust and grime. After unplugging the PowerFloat from the electrical supply clean the plastic parts only with a damp cloth. Do not clean with solvents. In humid environments wrap the PowerFloat drill portion in a dry towel for storage and if storing in the case ensure the lid is left open to allow air circulation.